Soulseek has a number of options, and in this walkthrough we’ll walk you through the settings and explain what they do and how to correctly setup the client for your needs.
Keep in mind Soulseek works, for the most part, fine out of the box. Especially important is to setup port forwarding, because without it you won’t be able to download from some users.
Login
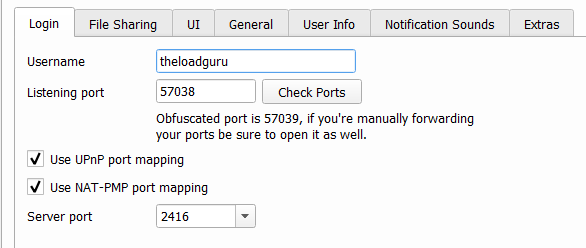
– “Username” is the username or user account others can see. It is bound to a password to protect it from others “stealing” your nick. To change it, you have to click on “Login As” on the top of the window (see screenshot below).
– “Listening port” shows you the port you can accept incoming connections on; this is infamous port you have to forward for maximum performance. There is also another port, named “obfuscated port”, which you also have to forward. In our example, it is 57038 and 57039, but it will be a different one for you.
You can change these by clicking on the “Change Listening Port” on top of the screen (see screenshot below).
– “Use UPnP port mapping” and “Use NAT-PMP port mapping” should both be checked, as it automatically forwards ports if your router and/or firewall allow this. For more information, consult our guide on port forwarding.
Important: If you want to forward ports and use a VPN for privacy and anonymity (we strongly recommend you do), just use a VPN with port forwarding. As a bonus, you don’t have to change any of your routers configuration when going this way.
– “Server port” is the port under which Soulseek contacts the central server. You can leave it as it is in most cases, no need to change anything about it.
![]() (The upper bar allows you to change both listening port and your nickname)
(The upper bar allows you to change both listening port and your nickname)
Now, let’s switch to the upport bar. There, you can also change your password by clicking “Change Passwort“. Keep in mind this password should be uniquely used for Soulseek, as it might not be saved securely on the Soulseek servers.
File Sharing

Here, you can configure exactly what and how you share files. A more pedantic user can control almost anything from here.
– “Download Folder” is the folder your downloads get saved to, and “Shared Folders” is a list of folders that you share with others. Both can be changed with the buttons on the upper menu bar.
– “Limit maximum number of queued uploads per user” puts a limit on how many of your files users can queue up to be downloaded from you. Doing so stops them from jamming your upload slots, or just aimlessly downloading your entire share. The same goes for “Limit maximum megabytes of queued uploads per user“.
– “Don’t create subfolders for single downloads“: Normally, when downloading a file, Soulseek will automatically create subfolders, containing the artist, album and so on. Uncheck this to save single track downloads to the main folder instead.
– “Don’t put downloads in Downloading and Complete folders“: N/A (we’re not currently sure, but looking into it)
– “Limit maximum number of search results per search”: Caps the amount of search results to the selected number.
– “Show privately shared search results“: Shows you files in the search results the user only shares with people on his friend list, and that might not be accessible for you. Choose this if you have no problem with asking people for permission to get their files. If you don’t want to go through the hassle, you can uncheck it, but this will hide some potentially interesting search results.
– “Show privately shared files when browsing user shares“: When browsing a users shares, you can either opt to only show files you can freely download (publicly shared), or also display results the user is only sharing with his friend list. See above.
– “Show files in folder dialog when downloading folders from search results“: N/A (we’re not currently sure, but looking into it)
UI
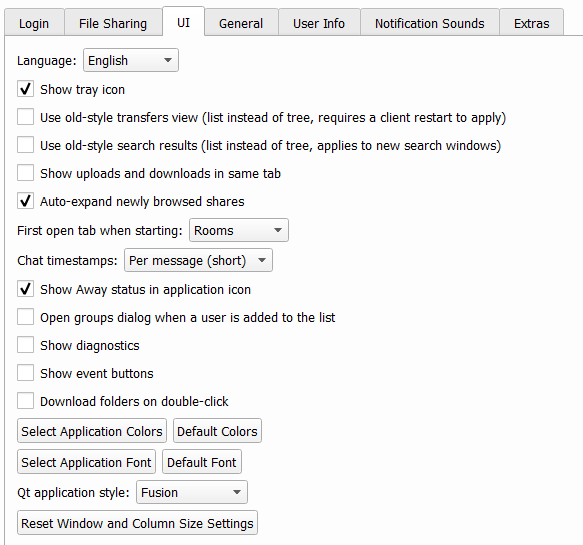
This tab changes some details in the clients appearance and, sometimes, layout. Only three of these options are important in our opinion:
– “Show tray icon” can be unchecked to remove the tray icon in the lower right corner of your windows task bar, in case you don’t want it to be displayed.
– “Use old-style transfers view” and “Use old-style search results” removes the tree-like structure of either of both; the new one is way more practical though, we recommend you don’t use these.
– “Show uploads and downloads in the same tab” merges both upload and download tab into one, not something we like a lot as it makes things messy.
General
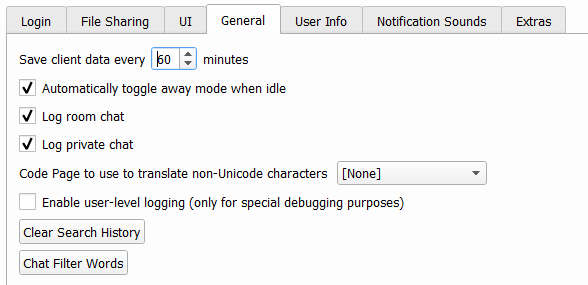
– “Save client data every x minutes” changes how often Soulseeks runs a backup of your personal settings, such as friend lists.
– “Automatically toggle away mode when idle” is handy if you often use the Soulseek community features and would like the software to automatically show this to other users after you leave the computer idle for a while.
– “Log room chat” and “Log private chat” keeps logs of your chats it saves it to your computer.
– “Code Page to use translate non-Unicode characters” is handy if you like to download files with names in non-latin letters (Chinese, Russian and various other asian languages).
– You won’t need “Enable user-level logging (only for special debugging purposes)” in most cases.
– “Clear Search History” does exactly that, and “Chat Filter Words” is for people who don’t like foul language and would like to have the chat “beep” some words.
User Info
Here, you can write something about yourself, and upload a picture if you want to. This section is often used to specify a their personal sharing rules by senior users.
Notification Sounds
Make Soulseek play a sound when certain things happen.
Extras
Extras only features one button, allowing you to import your user list from the former Soulseek client if you’ve been using it and want to switch to the new version.
