This is part 2 of our series on XDCC downloading. If you haven’t configured mIRC yet, or don’t know what this is about, please go to the corresponding part of our series:
Introduction: XDCC Downloading For Beginners
Part 1: How To Configure mIRC For XDCC Downloading
Part 2: How To Download With mIRC
Part 3: Troubleshooting
In part 2 of our XDCC tutorial, it’s time to start downloading. Hopefully you already configured mIRC as described in part 1, because if you didn’t, be sure to go back and get things set up before following these steps.
[x_alert heading=”Before you download:” type=”warning” close=”true”]Even though XDCC is safer than torrents, we absolutely think anonymization is a very good idea. We recommend a good VPN, as it is very easy to setup and very secure. Click here to get one right now.[/x_alert]
First, we want to find to find a bot on the network, offering a file we might want to download. This bot is on a certain chat room, and this chat room will be hosted on a server in the IRC network. Unfortunately, neither Google nor The Pirate Bay have an index for that, but a number of search engines are available. After finding the right server, channel and bot, we’ll connect to the chatroom and send the bot a command to request the file. Easy peasy as you’ll see in a second, but let’s go through the process step by step.
Step 1. Use a search engine to find what you want
SunXDCC.com is a good place to start, so let’s go over there and enter something in the search box (need help finding the right release? We’re here to help!).
The results will look something like this:
As you can see, packages are listed by network, channel and name of the bot. Each bot has a number of packs, and the file we want to download has the number #6. To the right, file name, size, the number of downloads from other users (“Gets”) and the speed record (“N/A”, aka not available, in this example).
Server URL and channel are listed at the top of the screen, and a click on the channel name (“#XDCC” in this case) will automatically fire up mIRC and open a connection to the right place. Other search engines have similar features to make things easier, just fool around a bit and you’ll find them.
First however, click on the package number and copy the command displayed on your screen.
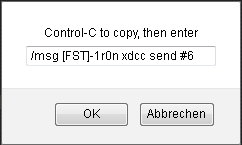
Can you make out how this command is structured? “/msg” is to send a private message to another user on IRC, “[FST]-1r0n” is the username of the bot, “xdcc” is the name of the data transfer protocol, and “#6” is the package number. You can pierce these commands together manually, but most search engines do it for you, so that you only need to copy & paste.
Highlight the text and hit Ctrl + C on your keyboard or use your right mouse button and copy the command. Now it’s time to…
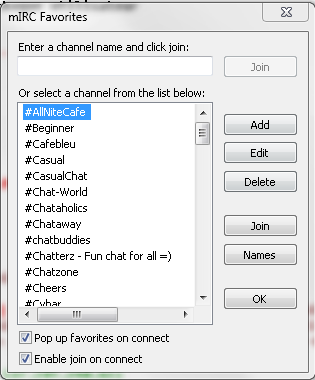
Step 2. Connect to the bots channel
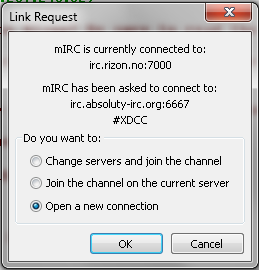
… click on the channel name and let mIRC do the rest! Alternatively you can manually add the server and use a command enter the right chatroom, which will be explained further below. This message will pop up, and we suggest to select “Open a new connection” as it will allow you to download multiple files at once from different servers and channels (if you’re already connected to the server and simply wish to enter a second room, choose “Join the channel on the current server”). Hit OK.
And here we go: This is how an XDCC chatroom looks like. See all those messages hitting the chat at an incredibly high speed? Bots are telling you all about their greatness here, boasting about all the stuff you can get from them, and also post interesting information such as amount of free slots and average downloading speed. Note the user list to the right: In this example, all users with the appendix “[FST]” are bots; quite a few, eh? Also notice how the bot communicates with you after sending a command; in the example below, it seems to speak French though…
Note: If you left sounds on in the mIRC setup, it might come in handy now, because you’ll be notified by a beeping sound when receiving any messages directly addressed to you. However, let me assure you that you’ll get tired of all the noise REALLY soon…
(Click to enlarge screenshot)
Step 3: Request the file and start downloading
Time to get that file! Enter the command you copied in step 1 at the bottom of the chat window and hit enter. Now, several things can happen:
[x_alert heading=”Before you download:” type=”warning” close=”true”]Even though XDCC is safer than torrents, we absolutely think anonymization is a very good idea. We recommend a good VPN, as it is very easy to setup and very secure. Click here to get one right now.
1. Your download starts immediately. Now talk about a great outcome! Just look at this beautiful sight:
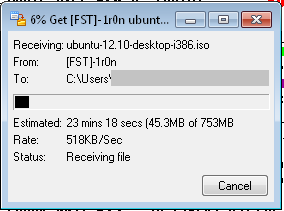 The speed you see here is on the lower end of the spectrum, but still way higher than with many torrents or file lockers.
2. The download doesn’t start, or you’re getting the wrong file. This can basically, have one of several reasons:
- Bots can go offline quite suddenly. In this case you’ll get a message in the main server window (the one in the background in the screenshot below) notifying you of this. You can wait for it to go online again or switch to a different one.
. - Your download has been queued. If the IRC / XDCC bot has no free slots, it might add you to a queue; look for messages from the bot to you in the chatroom for more information. It should be noted that there sometimes is a limit to the queues size, especially for very popular downloads, so getting a place in it might actually be a good thing.
. - The bot is currently overloaded. Wait for a while and try it again, bombarding it with more requests will only slow to down even more.
. - Your firewall is blocking IRC downloads. Change the settings to remove any limitations for IRC (most of the time it’s your networks firewall and not the Windows Firewall though), or alternatively use a VPN to circumvent the whole thing (particularly helpful if you’re on public WiFi or at work).
. - In rare cases, a file other from the one you wanted is send. The info about the bot on the search engine wasn’t up-to-date. You have to switch to another bot.
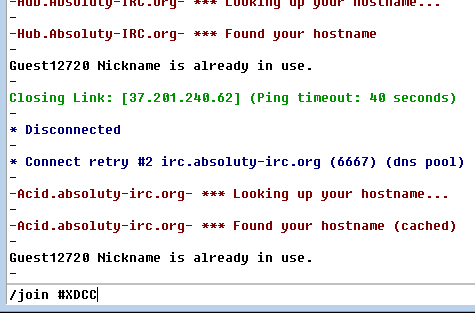
Optional: How to connect to a server and join a chatroom manually
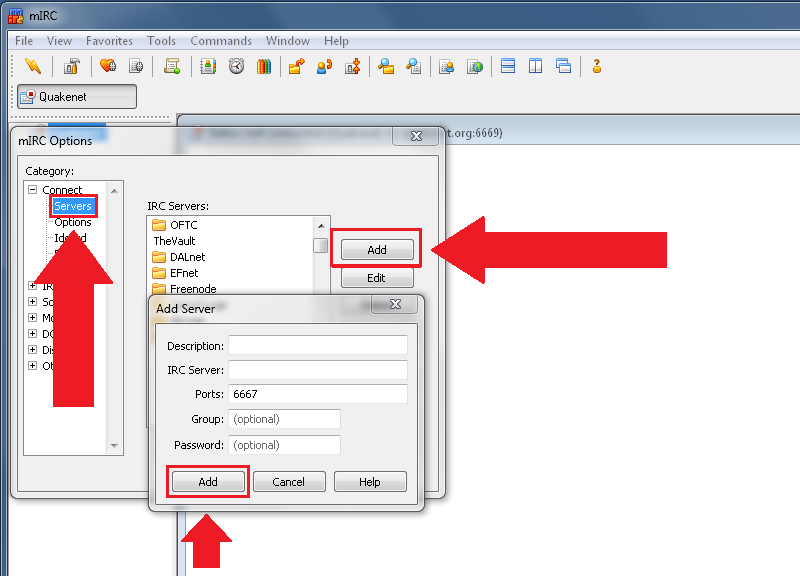
For some reason you might want to go through this by hand instead of using an IRC link. To add a server to your mIRC list, open the settings and go to “Connect – Servers”. Click the “add”-button and enter the server address in the “IRC Server” field, while entering a description under “Description”. It might also come in handy add a group, for example “XDCC”, to easily find the entry in the large servers list; you could call it “XDCC” or something. “Port” can be left untouched.
Click “Select” and “Connect”. Now, you can either enter the channels name in the window that pops up…
… or enter the “/join” command. Simple type in “/join #CHANNELNAME” and hit enter, as in this example:
This concludes part 2 of our guide on mIRC downloading. In part 3, we’ll go through some of the most common problems and how to fix them, so check it out: Part 3: Troubleshooting
Have we done a good job with this article? Got any feedback for us, or do you need some more help? Then be sure to drop us a comment below, we’d love to hear from you!
Other parts of this series:
Introduction: XDCC Downloading For Beginners
Part 1: How To Configure mIRC For XDCC Downloading
Part 2: How To Download With mIRC
Part 3: Troubleshooting
