This article is part of our “How To Upload” series and explains create an information file for uploads. Remember our “don’t do evil stuff” disclaimer!
So you want to add an nfo file to your upload? Awesome! Let’s stop wasting time: Here is our nfo creation tutorial!
First of all you need the “Cool Beans NFO Creator” and, when posting music or video files, “Mediainfo”, a program to get some details of media files. Download and install both. Now you’re ready to rumble!
Let’s fire up the NFO Creator:
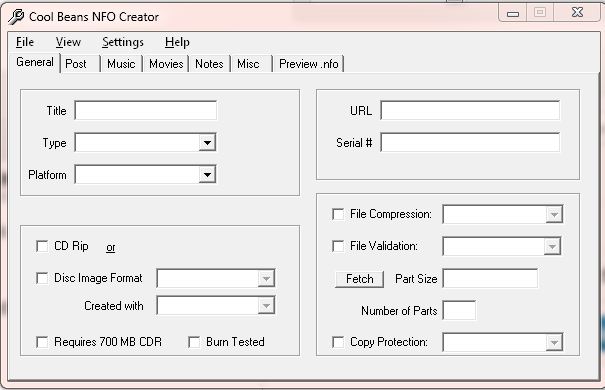
As you can see they’re a number of options, and you won’t need them all. However the more information you enter the better. Let us browse through the tabs:
1) General
Title: Enter the name of the album, movie or whatever you’re planning to post.
Type: Should be self-explanatory.
Plattform: Relevant if you’re uploading an application or a game.
URL: An URL with information about your offline, for example the official website.
Serial: If you’re uploading an application this could be relevant.
File Compression: RAR, in most cases, especially if you followed our guide.
File Validation: Just skip it.
Part Size: The size of split archives you created. If you used our guide it should be either 15 MB or 50 MB.
Number of Parts: The number of split archives (created by WinRAR if you followed our guide)
Copy Protection: In the case you upload an application / game you can select the copy protection.
CD-Rip / Disk Image Format / Created with: Did you rip a CD, for example by converting an album into MP3 files, or did you create a CD /DVD / Blueray image with a specific program? You can enter that if you want.
Burn Tested: Did you check if it’s possible to burn the image you created?
2) Post
This tab can be skipped; the last three options for example are completely outdated and from a time when Usenet had a retention time of merely days instead of years. You might want to adda poster nickname or similar though.
3) Music
Posting music? Then this tab is important for you. Some ofit is also relevant for videos, because after all, they got an audio track too, right?
Music Info (Title, Artist…): Should be self-explanatory.
Format: Apart from MP3 there are also other music formats; select the one right one.
CD Ripper / Encoder: Do you know with which program / encoder the music files were created? You can enter it here; it’s not really important though. Or, you might get this information is the next step.
CD Reader: Same goes for this one; which drive you used to rip your CD is of little importance.
Command Line: Just forget it.
Allocation / kBit/s / Hz / Channels: Especially the kBit/s part is interesting for users who care about the quality of the Mp3.
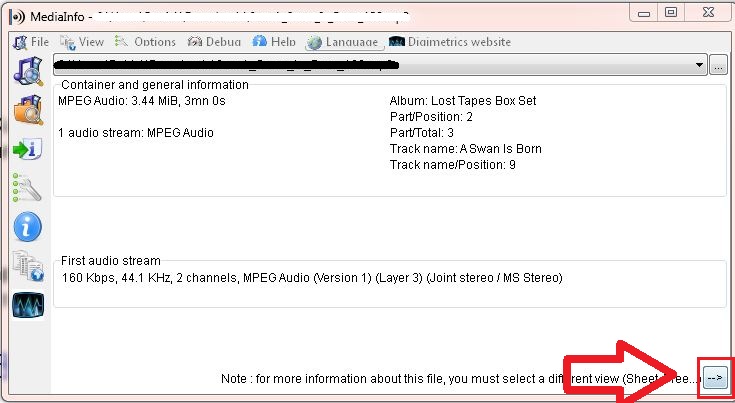
To get this data you need the other program. Start Mediaget and open the file to be analysed by clicking on “File” and then “Open” – “File”. Now we have to change the view mode to get all the information we need: Click on the little symbol on the top right corner, and select “HTML”:
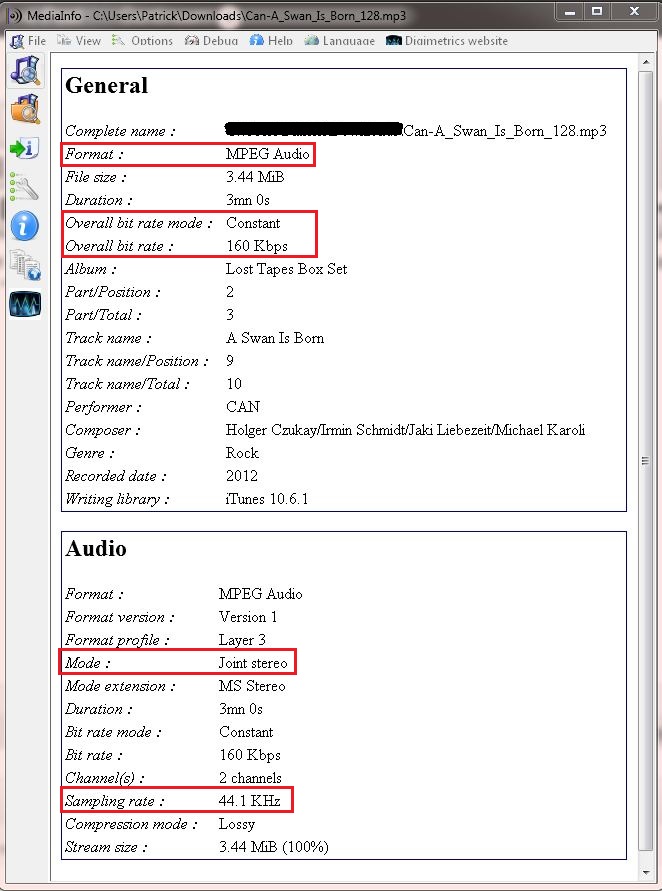
Now have a look at the following screenshot. In this example, there is no information about the ripping program or encoder used, but all the other data is being shown:
 Now here is an explanation on what is what:
– “Format” is the same as in NFO Creator: “MPEG Audio” is the long name for “MP3”
– “Overall bit rate mode” is called “Allocation” in NFO creator: In our example, it shows “Constant“.
The abbreviations in the editor translate to constant bitrate (“CBR“), variable bitrate (“VBR“), and average bitrate (“ABR“).
In our example we choose CBR.
– “Overall bitrate“: Enter the value shown in the box before the word “kBit/s”.
– “Sampling rate“: 44.1 KHz translate to 44,100 Hz in the editor.
– Last but not least, “Mode” means the same as “Channels” in the NFO software; “Joint Stereo” in this case.
Awesome! We got through all this confusing technical stuff!
4) Movies
If you’re uploading a video switch to this tab, then fire up Mediainfo and load the file. Then switch to HTML view mode as shown above. It should look something like this:
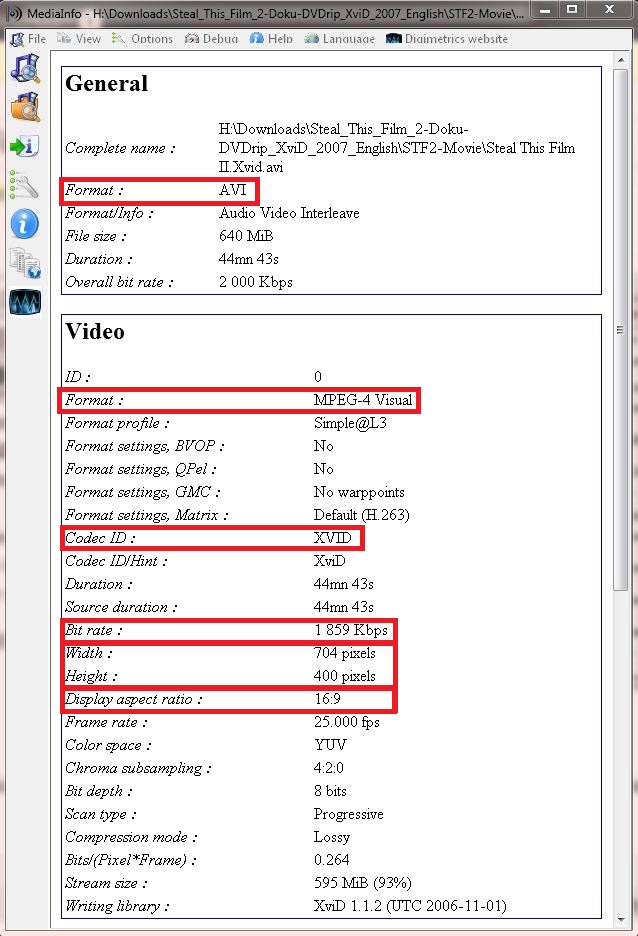
– Now, in the “Format” option enter “AVI“, but also the codec in brackets: AVI (Xvid) in our example.
– Enter the value shown for “Bitrate” in the “kBit/s” field of the NFO Creator (Kbps and kBit/s is the same)
– Resolution: Enter the “Width“, value followed by a space and “x”, then another space followed by the “Height” value: 704 x 400 in our example.
– “Bit depth” is the same as “Pixel depth” in the NFO Creator: “8 bits” in our example.
– “Frame rate” translates to “FPS“: “25.000 fps” in this case.
Now for the other fields:
– “Source“, “Genre“, “Movie Details URL” and “Disc Size” (you could also call it “File Size” in many cases) should be self-explanatory.
– “Original Format“: Mostly NTFS for DVDs from the US, PAL for Europe. Skip it if you don’t know.
– “IMDB Rating“: The rating given to the film on IMDB.com.
Almost there! You can add a note in the “Note” tab if you want; we suggest adding a tracklist in case you’re uploading an album or an audiobook.
Now go to the “Preview .nfo” tab, and be amazed: Yes, this is your work! Congratulations mate 🙂
Click “File” on the upper left corner, select “Save” and save your .nfo file.
Your Usenet post will have a beautiful .nfo with everything that matters in it… just imagine how it will set you apart from all these other wannabes :o)
